Enchiladas with a twist

Tags

, ,

Enchiladas are amazing. Cheeseburgers are by far my absolute favorite food on the planet, but enchiladas are pretty high on my list. Anything that involves gooey melted cheese is aces in my book. These particular enchiladas were the result of me just throwing things together, including a few spices that aren’t what you think of when you hear enchiladas. Curry powder and Moroccan seasoning to be specific. I know it sounds crazy, but the result was pretty damn good.vegetableenchiladas

Look at all that delicious cheese. Mmmmmm. Sorry about that. I got distracted. The recipe for these is pretty simple. I didn’t make the tortillas by hand like I usually do. [Curse you, tendonitis!], but they were yummy nonetheless. So, the meat of the recipe is going to be for the veggie filling, which was absolutely delicious.  So, without further ado…

Veggie Enchiladas [makes approximately 5 -6 enchiladas]

1/4 of an eggplant, cut into thin strips

1/2 of a zucchini, cut into strips

8 ounces mushrooms [I used crimini], diced

1 small onion

2 cloves garlic

sweet corn [I just used a few spoonfuls]

black beans [one can, drained]

1/4 cup olive oil

salt

pepper

curry powder [In enchiladas? Yes! Trust me!]

cumin

Moroccan seasoning [I know, I know, but trust me, it will be delicious!]

cayenne pepper

8 ounces Monterey Jack cheese

Now, for the seasonings, I eyeball it. I rarely ever measure and this time I didn’t at all because I was just throwing things in. Use your best judgement. If there’s something you’d like to add, add it. [Remember, these recipes are guides! Have fun!]

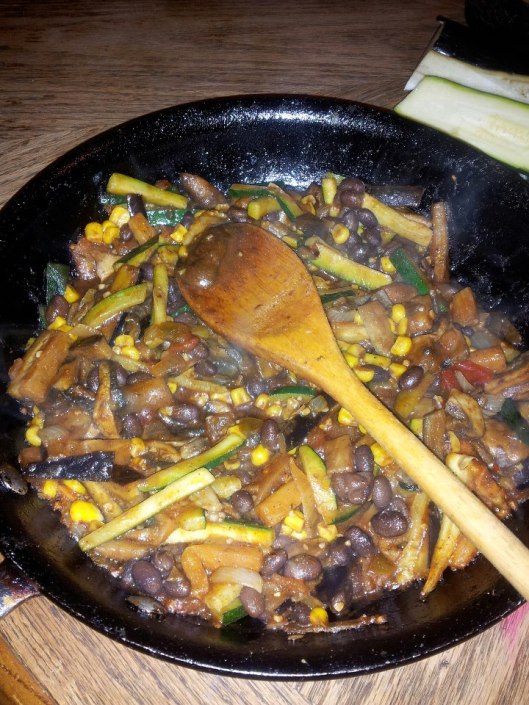
First, preheat your oven to 400 degrees. Now, add the olive oil to the pan on medium high heat. Add onions, then garlic. Once those are fragrant, add your spices. Mix that around until it’s nice and fragrant. Now start adding the veggies. Saute those around until they’re nice and covered with the spice mixture. It’ll look like this when it’s done.

veggiefilling

Pretty isn’t it? Ok, once that is all done, put a few teaspoons of filling into your tortillas. Fold over the ends and roll ’em up! Pour some enchilada sauce into a baking dish, put your rolled up enchiladas into the dish, cover with more enchilada sauce and some grated Monterey Jack cheese and bake for around 15 to 20 minutes. Enjoy!

Busy busy busy…

Tags

, ,

The holidays have really taken their toll. I haven’t had time to think, much less update this here blog. But, the kids are all back in school, I’ve got more free time on my hands. So, I’ve done some cooking since my last post. Quite a bit actually. My latest feat, homemade cheddar broccoli soup and homemade bread bowls.

Image

Now, neither recipe is mine. I tweaked the soup recipe just a smidgen, but I will give credit where credit is due. It’s a fantastic recipe that my husband came across on The Curvy Carrot. It’s a delicious recipe. The only thing i changed was the method. Instead of stirring my flour into the liquids, I made a blonde roux. That’s it. Oh, and I did add just a tad more broccoli than called for, but that’s just because I love me some broccoli. The bread came from Mel’s Kitchen Cafe. I will add that I had to slather butter on my bowls at the end and put them under the broiler for a few minutes to get them to brown. But I’m totally okay with that. The bread was tasty and soft and held up wonderfully to the soup. Enjoy!

Broccoli Cheddar Soup

Servings: approximately 8 servings

Ingredients

3 tablespoons unsalted butter

1/2 small onion, chopped

1/4 cup flour

1 cup whole milk

1 cup heavy cream

3 cup vegetable broth (plus more if needed)

Pinch nutmeg

2 bay leaves

Salt and pepper, to taste

2 carrots, grated

4 cups broccoli florets

8 ounces sharp cheddar, cubed

Instructions

1. In a sauté pan over medium-high heat, melt the butter.

2. Add the onion and cook until translucent, about 4-5 minutes, stirring frequently.

3. Remove the onions from the heat and set aside.

Now, this is where we diverge. I made a blonde roux using 1/4 cup butter and 1/4 cup flour. To that I added the cream, milk and then the broth. Aside from this step, everything stays the same.

6. Add the nutmeg, bay leaves, and salt and pepper (to taste) and let the mixture simmer,uncovered, for about 20 minutes.

7. Add the cooked onions, broccoli, and carrot, mixing well.  Let simmer for another 20 minutes.

8.  Add the cheese and stir until completely melted, adding more broth if necessary.

Bread Bowls

*Makes 6-8 bread bowls

INGREDIENTS:
1 1/2 tablespoons active dry yeast (use 1 tablespoon instant yeast)
2 1/2 cups warm water
2 teaspoons salt
2 tablespoons vegetable oil
7 cups all-purpose flour
1 tablespoon cornmeal

DIRECTIONS:
In a large bowl (or bowl of an electric mixer), dissolve yeast in warm water. Let stand until creamy, about 10 minutes. (You can omit this step if using instant yeast.)

Add salt, oil and 4 cups flour to the yeast mixture; beat well. Stir in the remaining flour, 1/2 cup at a time, beating well with an electric mixer at medium speed after each addition until a soft but not sticky dough is formed (you may not need to use all 7 cups). This bread bowl dough needs to be a bit firmer than a roll/bread dough so that the bread bowls rise up instead of out.

When the dough has pulled together, turn it out onto a lightly floured surface and knead until smooth and elastic, about 6 minutes (or let knead in an electric mixer). Lightly oil a large bowl, place the dough in the bowl and turn to coat with oil. Cover with a damp cloth and let rise in a warm place until doubled in volume, about 40 minutes. Punch dough down, and divide into 6-8 equal portions. Shape each portion into a round ball. Place loaves on lightly greased baking sheets sprinkled with cornmeal (or use silpat liners or parchment paper). If desired, slash the top surface of the bread bowl several times with a sharp knife or razor. Cover and let rise in a warm place, free from drafts, until doubled in bulk, about 35 minutes.

Preheat oven to 400. Bake for 15 – 18 minutes.

As I said, I had to slather on some butter and stick them under the broiler for a few minutes to get them nice and brown, but them not browning could be my error and not the recipe’s fault.

The important thing here is the end result, which was mmmmmmm delicious!

Doughnuts!

Tags

, , , ,

Ok, so I made these a while back, but I figured since I was already sitting down at my desk, I should go ahead and post this recipe now. I mean, we’re talkin’ doughnuts here, people! No fancy talkin’, let’s get down to it!

Doughnuts

Ingredients:
2 1/2 Tbsp yeast

2/3 cup milk, [warmed to about 98 – 100 degrees]

3 1/2 cups flour

1/3 cup sugar

2 tsp salt

7 Tbsp room temperature butter, cut into pieces


Process [I am doing this for a stand mixer because that is what I have. You can do this by hand as well.]:

Pour your milk into the bowl of your stand mixer fitted with the dough hook, add your yeast and a tsp of sugar. Allow it to sit for a few minutes and get foamy.

Now, add your flour, sugar, eggs and salt. Mix it on low speed until a dough forms. Mix for an additional 3 minutes. Keeping the mixer on low, add the butter, a few pieces at a time. Do this until all of the butter has been incorporated [you want to still see bits of butter in the dough]. Once all of the butter is incorporated, continue to mix on low for an additional 7 minutes.

Wrap your dough in plastic wrap and pop it in the fridge for at least 5 hours. If you’re smart, you’ll do this the night before and just let it sit overnight. Now, I know a lot of people think that frying doughnuts is tricky, but it’s really quite easy if you do a little prep work first. Trust me on this. I am not the best when it comes to frying things and if I can do this, anyone can.

When you are ready to make your doughnuts, take the dough out of the fridge. Place it on a well floured surface [I cannot stress this enough!]. Roll it into a 10 by 10 inch square to about a half an inch thick. Cut out circles of dough using a doughnut cutter or cookie cutter or biscuit cutter or you can do like i do and use a water glass. If you want holes in your doughnuts, use a small cutter to remove centers, I did not do this. I wanted to fill mine. Cut out as many as you can, you can reroll your dough to get more doughnuts. I did. Twice. It didn’t turn my doughnuts into rocks. Just do your rolling with a gentle hand and you will be fine.

Put your cut out doughnuts AGAIN on a well floured pan.  Cover loosely with plastic wrap and let them rise for 2 hours or until they look like little fluffy pillows of dough.

Heat your oil [I used canola oil and a deep fryer, but you can use whatever oil you prefer and a large pot as long as you have a thermometer] to 350 degrees. Fry each doughnut for about 2 minutes, flip it over and fry for another 2 minutes. Do not crowd them. Add a few at a time. They fry quick so it won’t take that long.
Remove from the oil and place on a tray lined with paper towels to absorb any excess oil.

Now you can top or fill them with whatever you like. Mine were filled with lemon and chocolate [I made the chocolate filling the night before as well. To fill them I just used a pastry bag, the tip you use doesn’t matter. Recipes for both fillings and chocolate glaze are at the end. Enjoy!


Lemon filling

I used the King Arthur Flour Microwave Lemon Curd recipe:

1 cup freshly squeezed lemon juice

1 cup sugar

1/2 cup (8 tablespoons) butter, melted

2 large eggs

Combine all of the ingredients in a large microwave-safe bowl. To avoid bubble-overs, the contents should fill no more than 1/4 of the bowl; an 8-cup measure works well here. Microwave the ingredients in 1-minute increments, removing from the oven and stirring to combine after each minute. When curd starts to thicken; coats the back of a spoon; and starts to mound a bit as you stir, it’s done. This will take anywhere from 4 to 10 minutes, depending on the strength/power of your microwave. Stir the curd one more time, spoon it into a storage container, and refrigerate until firm. Keep curd refrigerated for up to 3 weeks; freeze for longer storage.

Chocolate filling:

2 cups milk, room temperature

1/3 cup unsweetened cocoa powder

2 tsp vanilla

1/8 tsp salt

3 Tbsp cornstarch

1/2 cup sugar

In a pot on medium low heat, add sugar, cocoa, cornstarch and salt. Whisk to combine them. Slowly add milk, making sure there are no lumps. Cook and whisk until mixture is thickened and smooth. Stir in vanilla. Remove from heat. Pour into a bowl and let it cool. Place some plastic wrap on the surface and pop it in the fridge until cool.

Chocolate glaze

1 1/2 cups powdered sugar

3 Tbsp milk

5 Tbsp unsweetened cocoa powder

2 tsp vanilla

Whisk dry ingredients together. Slowly add milk and vanilla, stir until smooth. You may need a touch more milk to get it to the right consistency. Dip doughnuts and let rest.


Spare time = awesome grilled cheese sandwiches

Tags

, , , ,

Now that things are finally slowing down a bit, I can get down to business. The temperature took a pretty serious dive after the hurricane and we were not at all prepared for the colder weather. That meant finding wood, chopping wood, stacking wood… you get the picture, things have been hectic around here. I haven’t had a lot of spare time to do much of anything, let alone blog or cook or bake things that weren’t simply out of necessity. I had been dying to bake some bread. What is it about cold weather that makes me want fresh baked bread? Hmmm. Well, I got lucky! We had a few days that were near 70 degrees, just warm enough to keep the kitchen at a decent temperature so that I could bake some bread. Mmmmmmm homemade bread. Nothing fancy, just some no knead, rustic loaves. This isn’t the best photo [remember, I’m not a photographer, I cook!], but it still looks pretty yummy right?

I miss those 70’s plates. That big one is the only one I have left. *sigh* I’m getting distracted here. Recipes, that’s what you’re here for, right? Ok, but first, let me just tell you about what we did with that yummy bread. We made grilled cheese. Not just any grilled cheese, we used BACON! I know, I know. Some of you are thinking, “Bacon is overhyped! It’s not that great!”, on this we will just have to agree to disagree. Bacon made these grilled cheese sandwiches amazing! The gooey delicious cheese and soft thick bread didn’t hurt either. Trust me, you want to make these! But, to do so, first you need to make the bread. So, without further ado, the recipe…

Rustic No-knead bread

1 1/2 tbsp yeast
1 tbsp salt
6 1/2 cups flour
4 – 4 1/2 cups warm water [approx. 100* f]

Mix yeast with 4 cups of  warm water. Let sit for a few minutes until nice and foamy. Stir in flour until there are no dry patches. 4 cups may be enough, but you may need to add up to a half of a cup more. If you find your dough is dry, add a little more until the dough is completely wet. Your dough will be sticky. Cover lightly with kitchen towel and let rise at room temperature for about 2 hours or until doubled in size [depending on how warm your kitchen is, it could take more or less time]. Mine usually takes about 2 hours, but my kitchen is on the cool side.

Cut dough in half, of if you’re making rolls, cut into orange sized pieces. Turn the dough in your hands [make sure you flour them!] to lightly stretch the top. It should look like half of a ball. Put the dough on a piece of parchment paper and let it rest at room temperature for 40 minutes.

Now, place a broiler pan or a baking sheet with high sides on the bottom rack in your oven. Also,  place a pizza stone or a baking sheet with high sides turned upside down on the middle rack of your oven and preheat to 450*. Leave the pans inside oven and heat for 20 minutes. Now sprinkle the loaf with some flour and make 3 slices in top with a serrated knife or sharp razor. Place the first loaf on the baking sheet [leaving it on the parchment!]. Pour 2 cups of water into the broiler pan and close oven door immediately to trap in the steam, the steam is the key! Bake bread for 20 to 25 minutes [I baked mine for 22 minutes]. Keep other loaf[loaves] in fridge until ready to bake. Repeat process with other loaves. If you are baking rolls, your baking time may be shorter, keep an eye on it. This recipe makes 2 nice sized loaves of bread. It is easy to double this recipe, just make sure you have one bowl big enough to accommodate the dough or separate into two bowls.

Once your bread is done and cooled, you can make something like this…

Now go ahead and look me in the eye and tell me you don’t want it. I dare you. Can’t do it you say? Yeah, I didn’t think so.

This cake is not a lie…

Tags

, ,

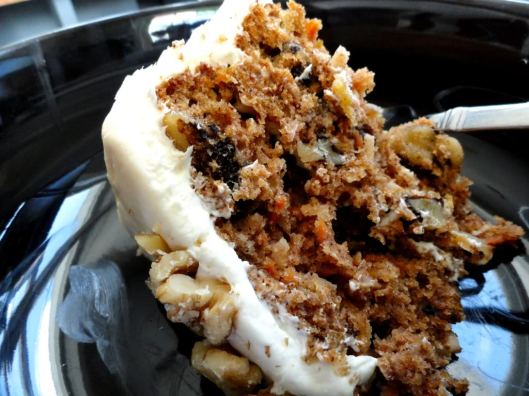
I have been neglecting this blog. With winter coming, there’s a ton to do and not nearly enough time to get it done. I have been cooking away, but I’ve taken very few pictures of my foodstuffs. A few end product pictures here and there [I will get those up soon!], but first I wanted to post this cake. This beautiful, sweet [but not too sweet!], moist, decadent, delicious carrot cake. Everyone in the house loves it, even the picky few who proclaim their hatred for carrot cake. This cake is so good that you’ll wonder why you ever wasted your time making any other cake. This cake will bring tears to your eyes. Okay, maybe not, but it is good. Really good. I use honey in this recipe, but you can use sugar if you like, some people don’t like honey. I love it so I use it as often as I can. This is my current favorite. This honey is glorious!

I am including measurements for both here.

Ingredients:

2 cups all purpose flour [You can use whole wheat if you like. I have. It’s delicious]

2 tsp ground cinnamon

1/2 tsp ground allspice

1/4 tsp ground nutmeg

1/4 tsp ground cloves

2 tsp baking soda

1/2 tsp salt

3 large eggs

1 cup honey or 1 and 1/2 cups sugar

1/2 cup brown sugar or maple sugar

1/2 cup grapeseed oil [You can use vegetable oil or olive oil if you like] or 3/4 cups if you’re using sugar instead of honey

1/2 cup buttermilk or 3/4 cups if using sugar instead of honey

2 1/2 cups grated carrots [Igrate mine into a colander lined with paper towels, and then wrap them up and let them sit for about a half hour to absorb some of the moisture]

1 and 1/2 cups very well drained crushed pineapple

1 cup grated coconut [optional]

1 cup chopped walnuts [optional]

1 cup raisins [soaked to plump and well drained]

Frosting recipe:

8 ounces cream cheese

5 Tbsp. butter [room temp.]

2 tsp vanilla

2 cups powdered sugar

Beat cream cheese, butter and vanilla until combined. Gradually add the powdered sugar until it is the desired consistency. Some people like their frosting a little looser, some more on the stiff side. Make it to your liking.

Preheat oven to 350 degrees. butter and flour your cake pans [i used 2 8 inch round]. you can use whichever pan you like, baking times for a bundt or tube pan will obviously be longer and if you make cupcakes, cut baking time accordingly.

Process:

combine dry ingredients into a bowl.

In another bowl, whisk together eggs, sugars [honey too if using], oil and buttermilk.

With a rubber spatula stir carrots, pineapple, and coconut into wet mixture.

Fold in dry ingredients. DO NOT OVERMIX! I cannot stress this enough. I will never understand why people want to beat the hell out of cake batter. Anywhoo, fold in the dry stuff, then stir in the nuts and raisins.


Pour into your prepared pans and bake for about an hour [I had to bake mine about 15 minutes longer, my oven just doesn’t seem to get as hot as my old one] or until a toothpick inserted comes out clean. If it takes longer, don’t get frustrated. This is a dense cake with a lot going on, it takes time! Don’t despair! I promise you, it is worth it. Once cake is cool, frost with cream cheese frosting and enjoy!

I hope you try it and I hope that you love it as much as we do.

Oh, crab macaroni and cheese, you complete me.

Tags

, , ,

Ok, well, perhaps not, but it comes pretty damned close. I’ve been toying with the idea of making it for a while now and finally took the decadent plunge. I cannot tell you how badly i was kicking myself for not making it sooner. It was creamy, cheesy, sweet, and just a little spicy. The photo below just does not do it any sort of justice.  Since this was my first time making it and trying it out on the family, I went a little light on the crab. I didn’t know how everyone would react. Now that I know everyone loves it, next time, more crab! Now, as far as this recipe goes, this is my best estimation. I am not a recipe follower, I am wholeheartedly a “throw cook”. I use recipes as a guide for things I don’t make often or have never made before, but I rarely, if ever, follow them to the letter.  I hope that is how people will use my recipes, as a guide.  Use your best judgment when you cook. If something looks off to you, don’t follow it and blame the recipe, do what seems right to you.

Crab Macaroni and Cheese

1 box pasta of your choice [my family likes shells]

1 8 ounce box velveeta [cut into cubes]

8 ounces both cheddar cheese and monterey jack cheese [cut into cubes]

approximately 1 pound crab meat [you can use imitation crab, that’s always cheaper and tastes just as good in this recipe]

approx. 1 cup milk

1/2 cup half and half

2 eggs [beaten]

salt

pepper

garlic powder

dried mustard

Old Bay seasoning

Process:

Preheat oven to 400 degrees. Boil noodles as usual. Drain well. Pour into your casserole dish. Toss with butter, sprinkle with salt, pepper, garlic powder, dried mustard and Old Bay. [Do this to YOUR taste. As I have said, I don’t really measure things, so use your best judgment regarding seasonings!] Pour in the half and half and milk, and add the beaten eggs. Stir well. The liquid should be visible. Not completely covering the noodles, but about half way. Stick the cubes of cheese down into the noodles, and do the same with the crab. Pop that bad boy in the oven. Set the timer for 10 minutes. The cheese should be melting about now, if not, give it a few more minutes, if it is, take it out of the oven and give it a stir. Pop it back in and let it finish up. It should take about 20 more minutes, but keep an eye on it. All ovens are different. It’s done when it’s nice and bubbly and the top is starting to brown. I like mine a bit more crispy on top so i let mine go a little longer. Remember what I said about cooking to your own taste and using this as a guide.

That should easily feed a family of four. I feed 7 on a regular basis so I make a bit more.  I hope you guys enjoy it as much as I did. If not, send me hate mail. I’m a big girl. I can take it. XD

How did I get here?

Tags

, , ,

I’m sure that’s what people are wondering, right? I mean, there are a billion and one blogs dedicated to food and recipes already so why do this? I’m not completely sure actually. I mean, I’m not doing this to “get noticed” or become some “famous” blogger or to make money. I just want to share what I do with people. I’m just a mom who loves to cook for her family and friends. I take pride in the things I make.  I want people to enjoy food, not just eat it. Now, I should say a few things before we really begin this thing.

First, I am not a photographer. Not by any stretch of the imagination. I am probably one of the least skilled people in that regard that you’ll ever meet. So, while my photos may not be beautiful, I assure you that the food contained within is delicious enough to make up for it. Does it seem like I’m tooting my own horn? Perhaps I am a little, but that’s okay. Would you want recipes from a person who was unsure of their cooking abilities? Exactly.

Secondly, I am not a professionally trained chef. I am a cook, a good one, but still, just a cook. When I cook, I do so with taste in mind, not aesthetics. If you want “pretty food”, foodgawker is that way. I’m not into fancy schmancy food. Sure, it’s nice to eat if someone else has prepared it, but that’s not my schtick. I’m doing simple stuff that anyone can make. Trust me, if I can do it, anyone can.

And lastly, I am not a technological whiz. This whole blog thing is foreign territory for me, so please, bear with me as I figure this whole thing out.
So, with that all said, I guess we begin our journey…